Smartphones are one of the few things we rarely leave behind — at least on purpose. They easily fit in your pocket or your bag, so bringing a mobile phone to a mission event or on a mission trip isn’t a burden — it’s likely coming along anyway.
Plus, with accessories for just about every condition, a smartphone can easily work in rain, sunshine or overcast days and even underwater. It’s little surprise they’ve become the preferred camera for travelers.
Move from the mindset of “taking pictures with your phone” to treating your smartphone as the high-end camera it is.
Smartphone cameras come with their own set of nuances and settings. Understanding these before hitting the road is important. Here are tips to do that and to make better mission photos and videos.
Invest in mobile photography gear
The whole “shot on an iPhone” advertising spiel is a bit of an exaggeration. It may have been captured on an iPhone, but the phone isn’t working alone. Mobile photography gear is quite versatile and compact. Investing in key pieces will take your travel photo or videography up a notch or two. Here’s what I would pack in my desert island photography bag:
- A tripod, maybe even more than one. A shaky camera doesn’t make for good photos or videos. Do yourself a favor and get a tripod. Tripods come in all sizes and some are even small enough to fit in your pocket, so there’s really no excuse. Selfie sticks often include a fold-out tripod in the handle, plus they may come with a Bluetooth shutter button. A gimbal is great if you plan to shoot video and want that smooth Steadicam look. The tripods with bendable legs are great for traveling because you can set them upright or wrap the tripod legs around a chair armrest, a tree branch, etc. when a flat surface isn’t available.
- A portable charger. A major con of smartphones is the already short battery life, which diminishes even more quickly when using the camera and editing apps all day. There are many brands out there, like Anker and Belkin, that make hefty portable chargers that hold enough power for two or three full charges. If you don’t want to carry another piece of gear, a phone case with a built-in battery is another great option.
- Mobile lens attachments. Mobile lenses are super small and come in several different focal lengths to add variety to your shots. You’ll get what you pay for. The high-end lenses — like the Moment lens — are really impressive and easily attach onto a phone case. Clip-on lenses are a more affordable yet still powerful option. Check out lenses made by Aukey or Olloclip. With clip-on lenses, precision is key. The add-on lens must be perfectly centered over your phone lens to avoid cutting off the edge of your frame.
- Backup storage. Smartphones offer limited storage. Cloud storage is great, but we all know that it can be difficult to find a strong Wi-Fi connection when you’re traveling. A mobile flash drive or hard drive is a great solution to both problems. SanDisk, RAVPower and Western Digital offer drives that connect to your phone, transferring media via their mobile apps.
- Bonus item: Waterproof phone case or pouch. If your trip involves any water activities, a waterproof case like Hitcase Splash or a waterproof pouch is a must.
Check and understand settings
Another perk to using a smartphone as a primary camera is that it takes photos and videos. That means settings to learn and configure are doubled. The default camera app settings typically prioritize quantity over quality, or storage space over resolution. So, we need to fix that. Check your camera settings to ensure you’re set to capture the highest quality images (“Most Compatible” on iPhone), not high-efficiency images.
For videos, decide what format and frame rate is best for you and the amount of available space on your phone. There’s a lot of hype around 4K video, but it may not be necessary or practical for your videos. A higher frame rate, such as 60 fps, may be more beneficial, especially when adding time effects like slow-motion. 1080p resolution is still considered high-definition with an incredibly sharp picture.
Best smartphone setting for video
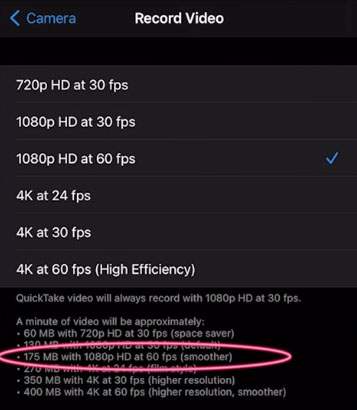
Smartphone cameras have settings for aspect ratio or frame size. Avoid shooting in anything lower than widescreen or 16:9. You can always crop a wide shot later to adjust framing. But if you shoot in square mode (1:1), you can’t go back. Stick to the wider aspect ratio.
Use the built-in camera features
One of the best things about smartphone cameras is that they come with cool built-in features unavailable with a typical digital camera. You just need to know to use them. Take time to know your device before your trip and figure out all the different tricks you have at your fingertips.
- Grid – Turn on the grid feature to easily frame a shot using the Rule of Thirds and the Golden Spiral techniques.
- Burst Mode – If a subject is moving, burst mode takes a dozen photos in a row, creating a series from which to find the best shot.
- Portrait Mode – Portrait mode is a fun image processing feature that digitally creates a blurry background effect. As its name suggests, this feature works best for taking portraits of subjects in front of simple backgrounds or when there’s a good distance between your subject and the background.
- Time-lapse Video – If you’ve ever seen the high-speed videos of flowers blooming or a sun rising, that’s called a time-lapse video. A smartphone camera can do that. Stabilize the phone with a tripod or a phone stand, and record in time-lapse mode for however long is needed to achieve the desired effect. The camera app automatically converts the video into a high-speed time lapse video.
Shoot from multiple angles
It’s always better to take more pictures than necessary. But don’t take them from the same spot. Move around to change perspective and shoot from multiple angles. Get creative: straight on, from the side, up close, from below. Be sure to utilize both landscape (horizontal) and portrait (vertical) orientations.
Find the natural light
Lighting is the unsung hero of photography. That’s why they say “LIGHTS, camera, action!” They also say “You can plan a pretty picnic, but you can’t predict the weather.” That’s especially true when traveling. Accept that lighting is out of your control. Learn how to use available or natural light to highlight your subject. Luckily, smartphone cameras do much of the lighting work automatically. There are a few simple tricks to make it even better.
When you can’t move the light, move yourself. Unless it’s a bright sunny day, do NOT use your camera flash — ever. Adjust the exposure (brightness) of your shot by tapping on your screen and dragging up or down. It’s better to shoot slightly underexposed (darker) shots and then brighten in editing.
Use the time of day to an advantage. Certain times are known for creating beautiful natural lighting, such as the golden hour—the hour after sunrise and before sunset—and the blue hour—the half-hour before sunrise and after sunset.
It’s not always possible to be in the right place at the right time while on a trip. Still, you can make great photos regardless of the hour. Don’t be afraid of harsh light, clouds and bad weather. Each scenario can add a unique element to images and make the color pop.
Don’t zoom in
The biggest difference between a DSLR camera and one on a smartphone is the zoom feature. DSLR lenses use optical zoom while smartphone lenses use digital.
Optical zoom involves the lens glass physically moving away from the camera sensor to magnify the subject. Camera lenses are identified by their focal lengths and measured in millimeters. The number refers to the distance between the lens glass and the camera sensor. The longer the focal length (60mm and greater), the higher the magnification and the narrower the shot. With optical zoom, the image resolution and number of pixels stay the same — no matter how far zoomed in.
Digital zoom enlarges the subject but is limited by the megapixels of the device. The zoom of a smartphone reduces the pixels of the frame and decreases the image resolution. It’s similar to the pinch-to-zoom gesture on a touch-screen device. Zooming closer, the pixels grow bigger, causing the image to become less sharp, more pixelated.
The image quality of smartphone cameras has come a long way. Higher resolution always comes with a DSLR camera.
Rather than compromising image quality by using a smartphone’s native digital zoom, move closer to a subject or find a way to get the subject closer to you. Using a lens attachment is a good alternative and allows for cropping/editing later for a tighter shot.
Like what you're reading and the tools we provide?
Edit your photos
YES, you absolutely should edit your work. Every photographer and cinematographer edits their shots, and so should you.
Perhaps the most valuable perk — the MVP, if you will — of using a smartphone for travel photography is the ease and accessibility of editing within the camera app.
Cameras aren’t designed to produce perfectly colored images, so editing is necessary. The goal is to edit in a way that doesn’t change the meaning of the image. Adjusting details like color, brightness and contrast help to enhance the tone of the picture.
Despite their popularity, filters are not your friends. Editing isn’t difficult but it can be overdone. The best practice is find an editing app that you like and practice using it. There are many impressive photo and video editing apps, both free and paid, that make editing a cinch. Adobe’s Lightroom mobile app is my favorite. It’s free and it also features camera capability. SnapSeed is another free and user-friendly app. VSCO is an old favorite that has both a free and paid version.
Get in your photos!
Hate to break it to you: Nobody wants to see another people-less photo of the leaning tower of Pisa; they want to see you and your friend pretending to hold it up!
The purpose of travel photography is to look back later to be reminded of all of the memorable moments — the big ones, the little ones and everything in between. Your smartphone makes it convenient to capture all the moments without compromising the quality of image or travel experience. Capture the moments of your trip because that’s what makes your pictures unique, meaningful and fun.
Final Take: Don’t take yourself too seriously
Seriously, don’t. The thing about trips is there won’t be a next time exactly as it is. Rarely are conditions perfect. It’s easy to get caught up in trying to get “the perfect shot,” especially when you’re visiting a popular spot or famous landmark. Every picture doesn’t have to be award-winning or even shareable. It just has to be made.
Don’t worry so much about following the rules. Use these tips as guidelines to help you capture your trip as best as you can using your smartphone.
Happy trails!

Kathryn Price is a video producer and designer at United Methodist Communications in Nashville, Tennessee.
_________________________________________________________________________________________________________________________________
Storytelling through photography is a ministry. United Methodist Communications uses photos and photography instruction to inform, encourage, motivate, inspire and engage followers of Christ--and we are resourcing churches to do the same. These efforts require financial support. If you believe in our mission, consider a tax-deductible donation to the work of United Methodist Communications through its Foundation at ResourceUMC.org/GiveUMCom.
![]()